
We love the Disney movie Cars in our house. And I don't just mean that my two little boys love it. I LOVE it! I remember when I saw the previews I wasn't that thrilled, but I was so impressed after I actually saw it. It wasn't just funny and visually beautiful, it was a wonderful tribute to Route 66. I love the theme of "enjoying the drive." It makes me want to take a Route 66 road trip across the US. I love that each time I watch it I notice some new detail or small joke, and let me tell you, we watch it a lot. Needless to say, we were pretty excited about Cars Land opening at Disney's California Adventure. However, it is slightly bittersweet for me because I very seriously wish I could have been an Imagineer who worked on this project. It is a pseudo-secret dream of mine to design rides for Disney. I already had this project planned out in my head. I can't say I would have done it better, because they did it all perfectly, but I wish I could say I was involved. Perhaps, I can dream of a second career someday, but for now I am very happy with the job I have the involves hanging out with two cute kids all the time. They help me bring my dreams home. We love looking at pictures of Cars Land online and dreaming about it because dreaming is all we can do. I hope I can take my children someday in the not too far away future, but since we weren't going in the very near future, we decided to bring Cars Land to us. We built our own version of Radiator Springs using the toys we had and a lot of cardboard.

This is what my back porch has looked like for most of the summer.


Not gonna lie, I am super proud of it.
These guys like it, too:

I can't tell you how hard it was to arrange these pictures because at any given time one of these essential cars is missing. Gus likes to carry them all around the house and then lose them and beg me to find them. We have three versions of McQueen and there are days I can't find any of them. So please, don't point out the fact that Cars 2 McQueen is in the picture above instead of the original one. It is a touchy subject. I actually borrowed Original McQueen and Lizzie from my sister's house for the picture below. Now that I see it here, I realize that Fillmore's got sat on again. Oh, well, I guess it just helps show the reality of the situation. I re-glue these things ALL the time. Gus seems to think Sarge's house is a chair and sits on it frequently. Fortunately, it pops right back up so not too much damage is done. But there are some downsides to these homemade toys. I see it as a good test of my patience. I feel like a pretty good mom when I see something get stepped on and manage not to cringe and just say, "Don't worry, we can fix it!" But there are times I don't feel like a good mom.

Needless to say, Gus was in Cars heaven now that his best friends Mater and McQueen had such cool places to drive.


It was worth every second I put into it to see these two cute boys love it so much.


AND NOW FOR A TOUR OF THE TOWN:
First Stop:
THE RADIATOR SPRINGS COURTHOUSE and FIRE STATION:

This one almost didn't get made. For awhile, we were using a little plastic firehouse we own. I was secretly wanting one like this, but had my hands full with the rest of the town, so I wasn't going to push it. Then one day Jimmy said, "All the other houses look just like the movie, except this one." Well, I didn't need to have my arm twisted. I got on it. Thanks to someone else's previous design endeavors that I found online, a little help from my Photoshop skills, and my dad's nice printer, this one didn't actually take that long. We used foam core to make it a little nicer and Jimmy painted the base, roof, and inside. It is two stories and the doors flap open.... until Gus pulls them off.


TOW MATER TOWING AND SALVAGE:

One of our early creations that didn't take too long and gets lots of love.
Materials: Cardboard box for the base and house, wine corks covered in brown paper for the oil barrels, small black rubber washers for the tires, a printed picture, white glue and hot glue, string and hook for the sign, dirt, rocks, and mulch (from our yard).
SALLY'S COZY CONE MOTEL
(recently refurbished):

This one took quite awhile, and was in fact refurbished at one point just like Sally says in the movie. We had to cut down the number of cones quite a bit so it wouldn't be gigantic, but it still ended up gigantic. Why, you ask, didn't I just buy some real cones instead of painstakingly building my own? Well, I looked at numerous stores, but all the ones I found had weird holes in them and were useless. All the better because these were free, but party hats may have saved me some trouble had I thought of it before my sister asked me if that is what I used.
Materials: The back of an old picture frame for the base (a thin wood composite board), foam core and plexiglass for the house (plexi was also from on old poster frame) and sign, assorted acrylic paint, printed sign (double sided), thin cardboard (from a frozen edamame box) for the cones, orange spray paint, black and red markers, silver pipe cleaners, packaging tape to laminate the doors on the cones, lots of white glue and hot glue and decoupage.

Originally I covered the Cozy Cones in orange construction paper. I would not recommend this for something that sits in any amount of sunlight. They looked great at first, but after only days of sitting in the sun, they were almost completely white. I had to take them back apart and spray paint them. Hopefully they should last awhile now. As I went on in the process I definitely got more elaborate, and started making things to stand the test of time. I also abandoned my original plan of only using things I already had in my house. I think I only ended up buying the following: silver and orange spray paint, rubber washers (for tires), glow-in-the-dark paint, and yellow electrical tape for the road. I didn't spend that much money, but I also can't claim that it was completely free. The foam core isn't exactly a free material, but my dad always has lots of scraps so I didn't pay for any of it. Still we used tons of old cardboard boxes so I we did a good job of "Reusing" as it is called.... Sorry, back to the tour.
LIZZIE'S CURIOS:

LUIGI'S TIRE SHOP:

RAMONE'S HOUSE OF BODY ART:

FLO'S V-8 CAFE:

I bought the first three of these for $5 at a Garage Sale. Best Steal Ever! I have tried in vain to get Flo's on Ebay, but it never seemed in my budget unless it was a broken version. We borrowed this Flo's from my sister for the occasion, but the good news is that they are selling it again at Toys R Us! These toys rock and have gotten so much love in my house. I would highly recommend if you ever see them anywhere and you have young boys.


DOC HUDSON'S GARAGE:
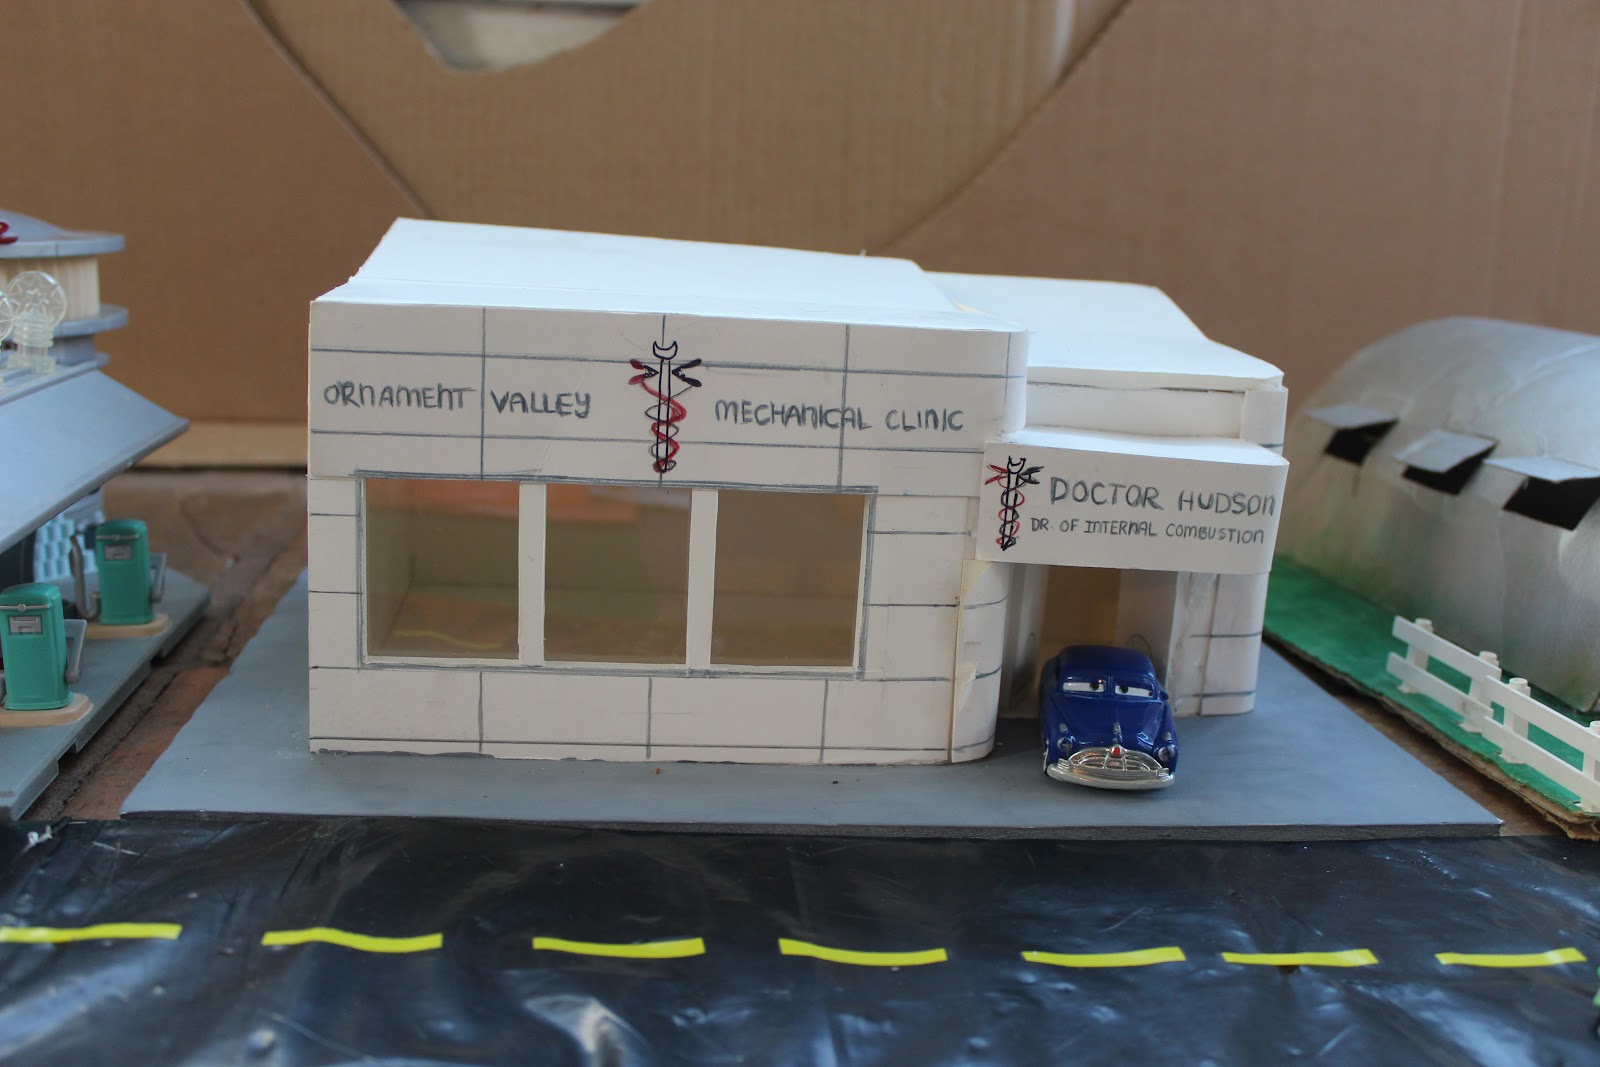
Jimmy's favorite feature on this one is that we added his secret room in the back and that we made the tops lift up so you can play inside easier.


He still tells me we need to decorate the inside more, but that can wait for another year.
Materials: Foam Core, Styrofoam, Cardstock, Grey Acrylic Paint, Colored Pencils, Glue.
SARGE'S SURPLUS HUT:

This was one of the first ones I built and it is still one of my favorites.
Simple and Classic.... but annoying to get cars out of.
Materials: Cardboard (I rip the top layer off to get the corrogated look), Green and Grey Acrylic Paint, Silver Spray Paint, Small Rocks, A Wooden Skewer, Paper and Colored Pencils for the Flag, Lego Fences, Foam Core and a Printed Sign and a toy cannon for the sign (We tried the glow-in-the-dark paint on this sign, but it is very hard to see even in a dark closet).
FILLMORE'S ORGANIC FUEL and TASTE-IN:
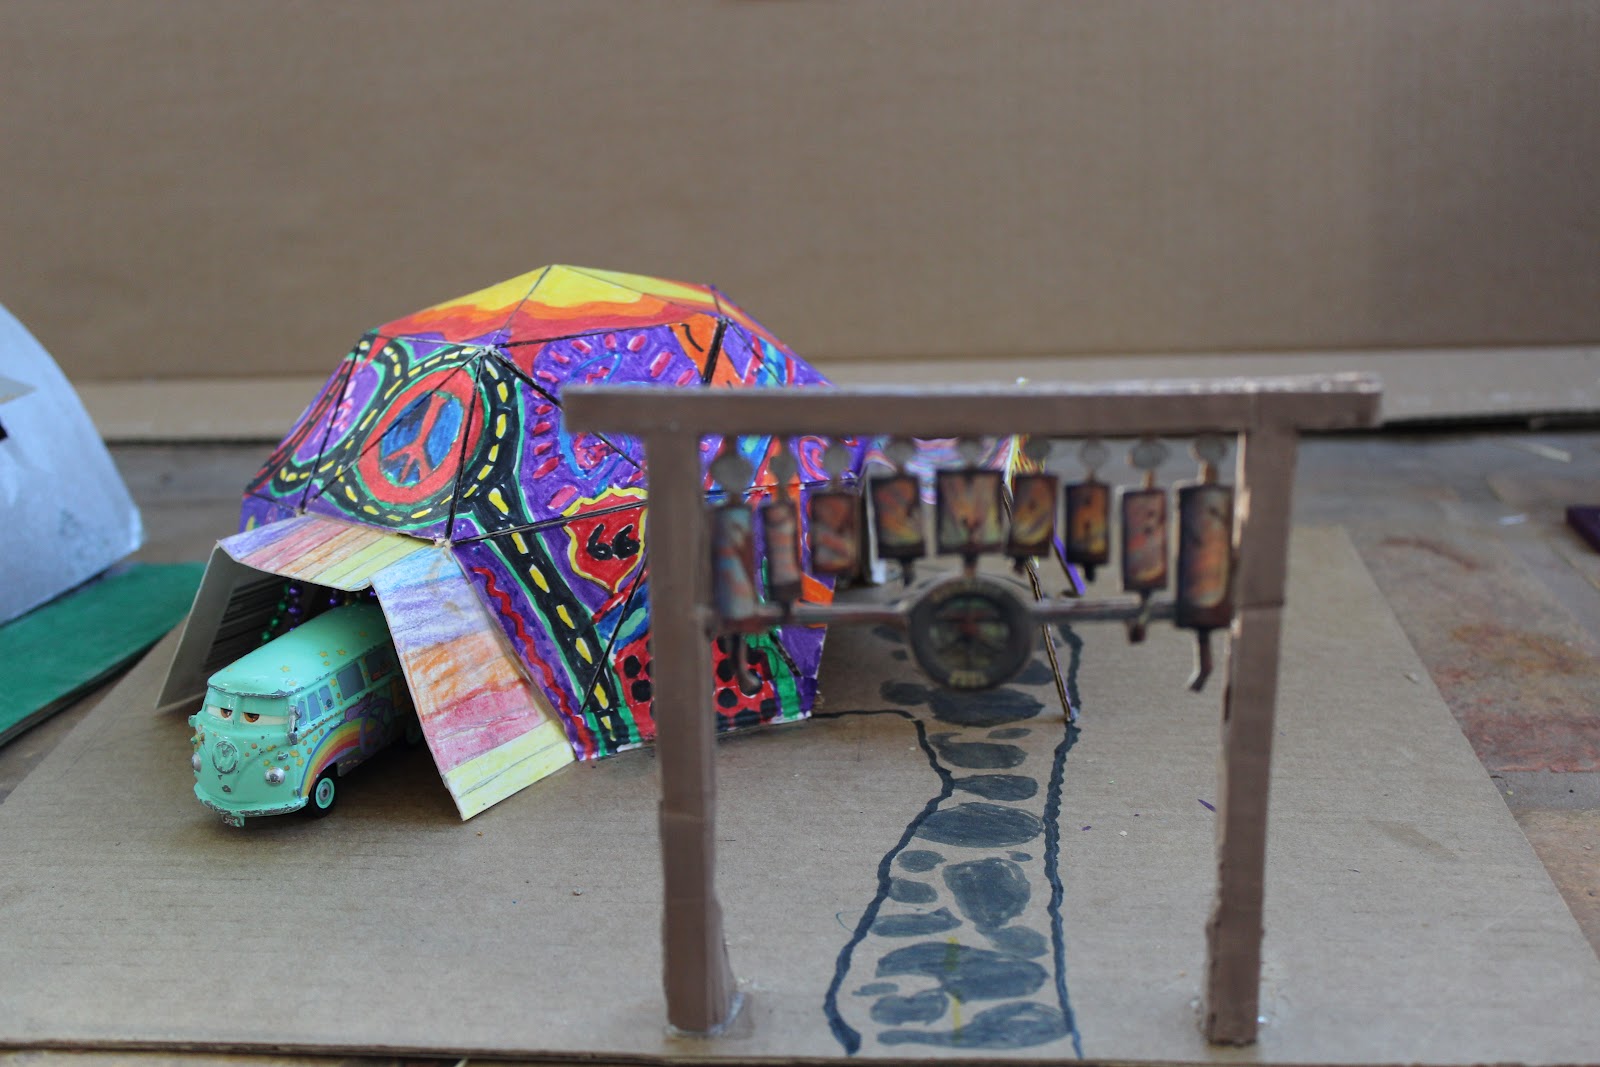
I won't go into too much details on the head ache making the geodesic dome was, but so you don't think I am too awesome, let me just say I completely made the wrong kind (there are multiple ways to do it) and had to attempt to fix it, so I could put in the door openings. Then drawing the images on it became problematic as well since the shapes were all off. Jimmy had so much fun coloring it though. After we had used wine corks for Mater's oil barrels, Jimmy got the idea to use them at Fillmore's house, too. I made it so all the barrels are connected and can come in and out as needed. We wanted to paint it with glow-in-the-dark paint, but since we used markers is was bleeding when we tried. If I can figure out how to coat it without ruining the pictures then we might still try to make it glow. Jimmy really wants me to try, but he did let me off the hook, so we could say we were officially finished with all of Radiator Springs.
Materials: For the House I used thin cardboard (a large chicken pot pie box), white glue and hot glue, binder clips to hold it together while glue dried, Crayola Markers and Sharpies, crayon on the door, a piece of paper we "tie-dyed" (for the canopy); wine corks, cardstock, glue, colored pencils, and markers for the barrels; Cardboard and a printed image for the sign with some brown acrylic, decoupage, and hot glue.


THE RADIATOR SPRING'S DRIVE-IN MOVIE THEATRE:

This is one of the last things I built. I didn't take too long, but it entertained us for an afternoon. We made it so that you can slide in different pictures into a slot in the top so you can change what movies they watch. Jimmy thinks it is awesome and wants to show everyone how it works. I suggested that he draw some of his own, but he told me, "They won't look as real as these ones." I told him that was okay, but he didn't believe me.
Materials: Foam Core, lots of high quality printed stuff (Thanks Dad!), glue, and assorted acrylic paint.


All right now for a little drive around the Cadillac Range:

Doc and McQueen race around Willy's Butte:


Mater and McQueen are always up for some tractor tippin':

Next stop:
THE WHEEL WELL MOTEL:

This one is almost entirely cardboard painted with acrylic.
The only exception is the little plastic gas pumps that came from my grandmother's house.
(More proof that you should save all your toys).

Then a drive on the bridge over the waterfall:


Then the thing perhaps both of my boys like best, sending cars down the hill:

And now for a little reenactment:


Then he drives off the road, crashes into everything, and drags Stanley down the road ripping it apart and ending up like this:


"Boy, you're in a heap of trouble." -The Sheriff

I plan to take more pictures like this so I can make a photo book of it as a Christmas present for the boys, but we will see if that happens. Just getting these ones was tough enough and you can see I resorted to using two different McQueens (Inconceivable!). As you can probably tell, I take on a lot of unnecessary but seemingly fun projects. So where did this crazy one begin? Jimmy and I had talked about it once, but on a much smaller scale. It actually started when my boys had "Hand, Foot, and Mouth" and were confined to our house for a week back at the end of May. I cut our old tv box into mountains and then the creative juices started flowing like crazy. I love having a project like this because Jimmy loves to help and I feel like I am teaching him so much about modeling and painting and just the whole design process. I also feel like I am not getting too rusty on my Scenic Design skills. It turns out an MFA in design doesn't only allow me to teach college, but also comes in handy during motherhood. Here is a peak into our process:


We looked up a million images online. I still have a file on my desktop called "Cars Stuff." Sometimes I would sketch things out and take measurements, but I had no real scale (Bad Scenic Designer! Bad!). I am fully aware that the Cozy Cone is gigantic next to the Courthouse (The Cones had to be big enough to hold the cars and the Courthouse had to be on a printable size of paper). Still, we make it work. Usually I just get some general measurements and start building. Fillmore's actually took lots of planning and studying online and I still got it wrong, but I sometimes have to remind myself why I actually do these things. Jimmy helped draw the picture for that one and probably had the most fun helping with it. He is so proud of these that he wants to take them to preschool for Show-and-Tell. Have I ever mentioned how much I love this kid?


It was nice to have this set-up on our porch during June especially when we could be in and out of our kiddie pool to stay cool. We took it down in July which made it more fun to set it back up again. It didn't get finished until late August, and it has been cool enough in September to be back out there enjoying it. I think we will keep it up through most of October and take it down for their birthday party so it will be a happy event and not a sad one... okay, it may still be sad. At least we can keep all the houses and set up a mini version in the boys room whenever we want. It will be a little sad to get rid of all the mountains and roads though. I am not ready to say goodbye yet. As they say, "Life is a highway and I want to ride it all night long."


Mary, I’m going to go ahead and say this. I love you but sometimes you scare me a little. This is intense.
ReplyDeletehaha, I just had waves of shame over my crappy road and garage made out of cardboard and duct tape. This is incredible!
DeleteYeah, I know. I am a crazy person.
ReplyDelete"recently refurbished" - i love it! oh, and flo looks like she needs a face lift...
ReplyDeleteSomeday your kids will realize just how amazingly lucky they are! Awesome! .....And Alissa is wrong. ;)
ReplyDeleteAs a doctor, I concur that you are insane. But in a good way!
ReplyDeleteAmazing!! We would pay admission to play at your Cars' Land!
ReplyDeleteThis is AMAZING! I found you via Pintrest while looking for inspiration to build my 3 year old son a RS..... he lives and breathes Cars! Would you ever be willing to share the Courthouse graphic you created? I am not all that talented in the grahic design area... :)
ReplyDeleteThis comment has been removed by the author.
ReplyDeleteThis makes me so happy. Your lovely spirit brings me joy.
ReplyDeleteReally awesome! My kids love it...we are trying to do the same, here! Any chance you could email me the link/files for the Courthouse, Cozy Cone Motel sign, Taste In, Fillmore's, Drive In, and Welcome to Radiator Springs?
ReplyDeleteAnd what did you use for mufflers for Fillmore's sign?
Thanks so much!!!
I am happy to share with anyone if you email me. Kim, the mufflers weren't anything special, just a printed picture on thin cardboard. Thanks for all the nice comments.
ReplyDeleteGreat job on your recreation of Radiator Springs! I'm working on building a model for my nephew. Would you be able to share the files you worked from? Thanks!
ReplyDeleteWow, wow, wow. My 3.5 year old and I love cars and I recently bought him a slot racer set that has the Disney Cars characters. I wanted to create EXACTLY what you did for his 4th birthday coming up in a couple months. My ideas was to incorporate the slot set so he could race in town. I have my work cut out for me on the models to say the least. The clock is ticking. I'm super impressed with what you did. I also need to find a way to get from Texas to California so little man can experience Cars Land.... hmmm.... maybe a trip down route 66?
ReplyDeleteSo where do you find room to display your "Coolest parent of the year" awards?
ReplyDeleteThis is killer!
Hi folks! Thanks for all the nice compliments. If you have contacted me and requested files, I am sorry that I haven't gotten back to you, but I was overloaded with requests. If I can find a way to share them on my blog then they would be easily available, but I don't have time to do that right now. For now, I recommend this website:
ReplyDeletehttp://carsthetoys.yuku.com
Since it is a forum it is a little hard to navigate to find what you want. Sometimes I had more lucky finding things on it using Google. I got the original image for the courthouse here:
http://carsthetoys.yuku.com/reply/9285/Main-Street-Drive-In-Question#reply-9285
However, I photoshopped it more and made it fit my needs. Good luck to you all in your own Radiator Springs ventures. Please feel free to share links to your own blogs if you ever post pictures.
This is so cool. I'm also attempting my son a radiator springs. I'm a beginner in projects......If you get time is there any way you could tell me measurements for the things you built? Thanks.....
ReplyDeleteGolly, I sure don't know the measurements. I made most of them up and they aren't particularly in scale to one another. The Cozy Cone ended up huge and the courthouse was only 11 inches long so that I could fit it on a normal printer. Just gage everything by the size of your cars. Good luck!
ReplyDeleteOmg you are such an inspiration! I wanted to build Radiator Springs and just knew someone already did so I started searching. I have the cozy cone built and think I will tackle Sarge's next! Could you please email me any signs that would make the project easier? I will send you an email now;) thank you so much for inspiring me!! You are awesome and I love your craziness!
ReplyDeleteI am in awe...! You guys are the coolest parents in the world, and the memories to go along with the making of it as well as playing will last a lifetime. Definitely parenting done right...!
ReplyDeleteThis is ABSOLUTELY AMAZING!!!!!!! My son has every single die-cast from the movie's and the roads and buildings etc, however we do not have the same Flo's that you do here! :/ He has the movies and I could say every line from them since I've watched them so many times! Though, now he's 10 years old..... he looked at the pictures and thought it was awesome.... just not sure he'd enjoy it as much at this age. WISH I saw this years ago.... CARS was his life!! Lol He would have played for hours, day after day! LOVE this!!!!!!!
ReplyDeleteI am doing the same thing and it is turning out great!
ReplyDeleteawesome!! I'm also attempting my son a radiator springs. I'm a beginner in projects. But in Brazil is very difficult to find the playsets..
ReplyDeleteWOW !!!
ReplyDeleteAfter some research on the web about the Radiator Spring city, I find your and is awesome... You do a great job ;)
This is so awesome! I have my own Radiator Springs that is basically just cardboard, paper, and the Cars playsets! I may remake my Sarge's Surplus Hut to look more like yours!
ReplyDeleteLove your works, mate! I made some https://scontent-frt3-1.xx.fbcdn.net/hphotos-xtp1/t31.0-8/fr/cp0/e15/q65/12694856_789284167843652_2340877063403124846_o.jpg?efg=eyJpIjoidCJ9
ReplyDeleteThat's my 1st expirence...
Best regards, Sergey, SPb, Russia
This is so nice! Really inspirational!
ReplyDeleteAny chance you still have these buildings and want to sell them? We can't find them anywhere unless we are willing to pay over $200 per building!
ReplyDeleteSorry. They are still pretty loved at our house. Good luck!
DeleteThis comment has been removed by the author.
ReplyDeleteThe cozy cone sign was a printout that I glued onto a piece of foam core. I had to put a piece of wire through it to give it some more support, but it eventually broke. I tried fixing it many times, but it has so little support at the bottom that it is tricky. Good luck with your big project!
DeleteWow!! You did a great job!! Lots of work. I'm so impressed. My 8 year old son loves CARS. He would be in heaven!!
ReplyDeleteWe love it! You inspired me! Thanks so much for sharing it! :)
ReplyDelete